


1. Trade Station Or City - DOCK OR ENTER CITY
2. "Weapon Lab" Button - SELECT
3. "Change Type" Button - PRESS TO CYCLE WEAPON TYPE
4. "Change Class" Button - PRESS TO CYCLE WEAPON CLASS
Note: When initially selecting a weapon, the settings will reflect that weapon's default capabilities.
5. Required Material - CHECK
- a. Electrical Units - AS REQUIRED
b. Metal Units - AS REQUIRED
c. Machinery Units - AS REQUIRED
d. Fusion Units - AS REQUIRED
6. Cargo Bay Or Equipment/Weapons Slot - EMPTY
7. Sliders - ADJUST AS DESIRED
8. Weapon Performance Indicators - CHECK
9. "Construct/Modify And Install" Button - PRESS TO CONFIGURE
COMBINING LIKE-ITEM CARGO
Note: Like items can only be combined when docked at a trade station or city. Attempts to combine cargo items at any other time can result in the selected cargo being discarded.
1. Item To Transfer - HIGHLIGHT (CURSOR)
2. Alt Key - PRESS AND HOLD
3. Selected Item - TRANSFER (RIGHT-CLICK)
CONDUCTING CONTRACTS BETWEEN PILOTS
Note: To successfully initiate a contracts between two pilots, it is important for the parties to complete the following steps in the order listed.
1. Contractor - TAGET CONTRACTEE (T)
2. Contractee - TARGET CONTRACTOR (T)
3. Contractor - SEND TRADE REQUEST (F4)
4. Contractee - ACCEPT TRADE REQUEST (F4)
5. Contractor - DETERMINE REWARD
- a. "Arrange Contract" Button - SELECT
b. "Cash" Button - SELECT
c. "Enter Amount" Window - INPUT CREDIT PAYOUT
d. Correct Amount Offered - CHECK & PRESS ENTER
- a. Destroy Player - SELECT NAME OF TARGET
b. Destroy Hostiles - SELECT TOTAL NUMBER
c. Recover Materials - SELECT TYPE OF MATERIAL- Platinum Units
Biological Units
Oxygen Units
Gold Units
Silver Units
Water Units
Metal Alloys
Diamonds
- Platinum Units
8. Contract - CHECK
- a. Inventory Console - OPEN (F3)
b. Trade Contract Description - CHECK
10. Trade Contract Completed - CHECK
- a. Credits Paid Out - CHECK
b. Credits Received - CHECK
c. Current Pilot(s) Status - AUTO SAVED
TRADING
1. Ship-To-Ship Trade Console - OPEN (F4)
2. Trade Link Accepted - CHECK
3. Items To Offer - SELECT
- a. Credits - AS REQUIRED
- "Enter Amount" Window - INPUT PAYOUT
Correct Amount Offered - PRESS ENTER
- "Enter Amount" Window - INPUT PAYOUT
- a. Credits - AS REQUIRED
- "Enter Amount" Window - INPUT PAYOUT
Correct Amount Offered - PRESS ENTER
- "Enter Amount" Window - INPUT PAYOUT
OPERATING A TERRAIN WALKER
1. Terrain Walker - INSTALLED
2. Planetside - HOVER
3. Terrain Walker - ENTER (K)
4. Status - CHECK
- a. E - Engine Integrity
b. C - Cannon Integrity
c. N - Navigational Radar Integrity
d. J - Jump Thrusters Power
e. W - Weapon Power
f . H - Hull Integrity
- a. Forward - STICK FORWARD (W)
b. Back - STICK AFT (S)
c. Turn Left - STICK TWIST LEFT (MOUSE)
d. Turn Right - STICK TWIST RIGHT (MOUSE)
e. Strafe Left - STICK PUSH LEFT (A)
f . Strafe Right - STICK PUSH RIGHT (D)
g. Jump - (SPACE)
7. Tractor Beam - ENGAGE/DISENGAGE (ALT B)
8. HUD - TOGGLE (H)
9. Terrain Walker - EXIT (K)
FLYING IN FORMATION
Note: Members of the same clan are already linked. For members of different clans to link up, permission must be initiated by one pilot and subsequently accepted by another. Normally, the wingman will initiate the request, allowing the intended flight lead to either accept or reject the offer.
LEAD
1. IDS - AS REQUIRED (SPACE BAR)
2. Energy - SET 5S/-5W ([)
3. Wingman - TARGET (T)
4. Clan Link Request Received - ACCEPT (NUMPAD -)
5. Wingman - FORMED UP
6. Autopilot - AS REQUIRED
7. Formation - MONITOR
8. Clan Link - CANCEL (ALT NUMPAD -)
Note: When lead accepts the request, both ships display as green (friendly). Conversely, when either pilot cancels the link, only that pilot will then see the other pilot's ship as red (foe).
WINGMAN
1. IDS - AS REQUIRED (SPACE BAR)
2. Energy - SET -5S/5W (])
3. Lead Ship - TARGET (T)
4. Clan Link Request - SEND (NUMPAD -)
5. Clan Link Accepted - FORM UP
- a. Formation - ENGAGE (F)
b. Formation - DISENGAGE (F)
Note: When lead accepts the request, both ships display as green (friendly). Conversely, when either pilot cancels the link, only that pilot will then see the other pilot's ship as red (foe).
EXITING MULTIPLAYER
1. Countdown - INITIATE (ESC)
2. After 10 Seconds - EXIT
3. To Cancel Countdown - ABORT (ESC)
STORING ITEMS
1. Trade Station - DOCK
2. "Hangar" Button - SELECT
3. "Store" Button - PRESS TO STORE ITEM
4. "Exit" Button - PRESS WHEN DONE
Note: If a pilot uses the same profile on different servers (and/or in single-player), storing various items at different locations (default and/or player built) on each server (or SP), all items will be listed in Hangar Details but only those items stored at locations on the particular server (or SP) will be charged a station fee.
LOADING ITEMS FROM STORAGE
1. Trade Station - DOCK
2. "Hangar" Button - SELECT
3. "Load" Button - PRESS TO LOAD ITEM
4. "Exit" Button - PRESS WHEN DONE
REQUESTING INFORMATION FROM AI
1. AI - TARGET (T)
2. Ship-to-Ship Trade Console - OPEN (F4)
Note: Target must be inside 1000 units to establish a trade connection.
3. "Request Information" Button - SELECT
4. If Payment Required - PRESS AGAIN TO TRANSFER CREDITS
5. "Adding Data Message to Message Log" - MONITOR TRANSMISSION
6. Chat Window - CONFIRM DATA MESSAGE SENT
7. Ship-to-Ship Trade Console - CLOSE (F4)
APPENDIX
Navigation
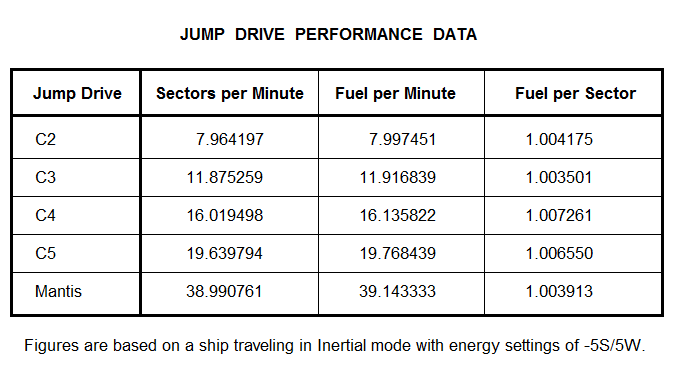
When traveling long distances, the pilot is advised to use the most advanced jump drive available. After each jump, there is a recharge time during which a slight amount of fuel is burned. As seen in Figure 1, higher class drives cover a greater distance per jump. Consequently, they require fewer recharges, thereby burning less fuel over the same distance.
For a pilot flying solo, the optimum method of travel is with inertial engaged and energy bias set to provide maximum power to weapons. By utilizing inertial, IDS will not attempt to bring the ship to a halt after each jump (a maneuver which burns significantly more fuel). Diverting energy to weapons increases the recharge rate, decreasing the recharge time per jump (significantly shortening the time between jumps, thereby shortening the time enroute).
- [img=507x280]http://img.photobucket.com/albums/v97/p ... especs.png[/img]
Figure 1
In most situations (either when flying solo or when leading a formation), autopilot should be engaged to limit the delay between jumps. An exception would be when flying in formation and the length of the formation is such that one or more trailing ships cannot recharge fast enough for each consecutive jump.
To collect the data listed in Figure 1, jump drive tests were conducted using an Avenger with 2400 units of fuel, flying in a straight line on autopilot. For lower class drives, the ship flew for two hours. For the Mantis and Class 5, the test was run until fuel reserves were below 90 units. Each test ended at the point where autopilot was disengaged and energy built back up to 100%. Remaining fuel was noted after the ship came to a full stop.
Change 1. Appendix added with Jump Drive permance chart.
Change 2. Added steps for requesting information from an AI.
Change 3. Changed Contracts Between Pilots checklist to reflect new procedures.
[Edited on 12-8-2012 by Marvin]
[Edited on 12-15-2012 by Marvin]
[Edited on 12-22-2012 by Marvin]


