Page 1 of 2
replacing star fields problem
Posted: Wed Feb 08, 2017 10:10 pm
by DORN
Hi there,
I cannot find the \environment folder in my main Evochron Legacy root folder. Is it somewhere else? ( Actually, I do not see any folders.)
I do believe that I have hidden files and folders option turned on.
If I could find it, I know how to replace the 6 .png images in the star field sky box.
So what would help me is a short little walk through of how to find the folder to replace the .png images.
Thanks.
Re: replacing star fields problem
Posted: Wed Feb 08, 2017 11:12 pm
by Marvin

There is no environment folder unless you've created one yourself ... or you've installed other mods which use that folder. Ergo, make one the old fashioned way and then drag your skybox mod into it.
Re: replacing star fields problem
Posted: Thu Feb 09, 2017 10:32 pm
by DORN
Hi Marvin,
I just checked my Evochron Mercenary root folder and it has several subfolders, one of which is Environment. I thought that the EM root folder came default with these sub folders.
Just to make sure about your instructions for EL.....
Are you saying that I need to create this new Environment folder with the six skybox .png and then just drop it in the EL root folder?
Do I need to do anything else? Like delete the current six sky box .png, or add and lines to any config files in EL or anything else?
Thanks
Re: replacing star fields problem
Posted: Thu Feb 09, 2017 10:50 pm
by Vice
EM and EL share folder name similarities, but many options are new and different in the new game compared to the old one. Included in that are the background texturing options, which are different in EL. The customizing kit is available online here:
http://www.starwraith.com/evochronlegac ... readme.htm
And the 'Skybox and Background Effects' section covers how to set up the different texture images for each of the two available layers. In short, you can use one for a universal background image set (ie global starfield) and the other for more unique backgrounds (individual nebula backdrops and/or unique starfields). So you can blend to mix and match to get the background effects you want, including for unique sections of space with the color divisions outlined in the customizing instructions.
Re: replacing star fields problem
Posted: Fri Feb 10, 2017 12:26 am
by DORN
Hi Vice,
Thanks for the notes.
I followed the directions in the customizing kit , but I must not be doing something correctly.
1. I made a new folder and labeled it 'environment'.
2. I palced the 6 .png images in the new environment folder.
3. I named the .png images.....starsback-0[high].png and etc. to starsback-5[high].png
4. I placed the environment folder in the EL root folder.
But I see no difference in the star background.
Do I need to do anything else?
Re: replacing star fields problem
Posted: Fri Feb 10, 2017 12:35 am
by Vice
You won't see any change with the 'starsX-Y.png" image set unless you are in the color defined location within the game's universe to use them (that image set is the location specific image set). The 'starsback' image set requires detail labels in their filenames that match the texture detail level you've selected in the Options menu (ie low, medium, or high, without brackets). You'll want to use the 'starsbackX-#.png' image set if you want global background results.
Re: replacing star fields problem
Posted: Sat Feb 11, 2017 12:06 am
by DORN
No luck getting the star field background to change.
I have the folder "environment" placed in the EL root folder.
Inside the "environment" folder I have placed the six .png images labeled..... starsx-0.png, starsx-1.png, starsx-2.png, starsx-3.png, starsx-4.png and starsx-5.png.
When I load Launch or Training, I see no change in the star background.
I must still be missing something.
Re: replacing star fields problem
Posted: Sat Feb 11, 2017 12:11 am
by Marvin
Not sure if it makes a difference, but did you use X instead of x when labeling the files?
Oh ... wait. You don't use X (if I read the instructions correctly). You use:
The X can be a number from 1 to 4, 1 for the blue color background, 2 for green, 3 for purple, and 4 for brown.
Re: replacing star fields problem
Posted: Sat Feb 11, 2017 12:16 am
by Vice
Yeah, I think I may have mislead you by mistake on one of my prior posts... I recommended the image set names backwards. I've corrected that, which may help the initial confusion

My apologies for that. 'stars' is color specific, 'starsback' is for a global background image set.
As for the 'starsX-Y.png' image set filenames, what are you using for 'x' in those filenames? The numbers are correct for each of the six directions, but 'x' will need to be numerically lined up with whatever color index you want to apply them for.
Re: replacing star fields problem
Posted: Sat Feb 11, 2017 12:23 am
by Marvin
Speaking of sky boxes, it reminds me of an old post concerning the Milky Way galaxy.
Blue
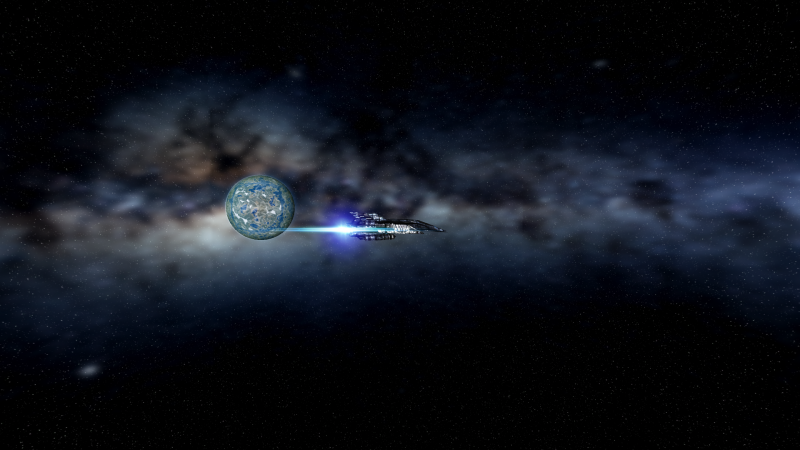
Green

Purple
Brown

Chocolate

The colors correspond to those of the default background textures ... except for the last one. Which I only use during long hauls across the Evoverse.
Re: replacing star fields problem
Posted: Sat Feb 11, 2017 4:37 pm
by DORN
Hi there,
It is still not working for me so I think I need to take a step back and check a few things with you all.
1. First of all, how do I remove the nebulae completely? .....so I can just see the stars?
2. I checked the sizes of my .png and one set of six I have tried is 839 x 546 pixels. The other set is 1280 x 727 pixels, Does this have anything to do with being able to get them to work correctly? Do they have to be of a certain size?
3. And to double check...Starsx is to change the nebulae to a certain color. Starsback is to change the star field background. Correct?
Thanks.
Re: replacing star fields problem
Posted: Sat Feb 11, 2017 5:39 pm
by Vice
1 - You'll need to replace the stars[color]-[direction].png images for the color zone you are in with blanks. Just small 8X8 or so blank DDS textures will work. or replace all 5 possible image sets (5 X 6 = 30 total images) to clear all of the background layer option for this image set option.
2 - They would still load, but might look strange. Since each image is part of a cube map covering 90 degrees of viewing angle, you'll want to use a 1:1 ratio for each of them, such as 1024X1024 or 512X512. If you have a sphere map to work with for your background, there is a utility included with the customizing kit to convert that image into a set of cube map images.
3 - Yes, stars[color]-[direction].png for background nebula/effects layer and starsback-[direction].dds for the starfield layer. If you want to use 'png' images for the starfield at the moment, try leaving out the dash for now (starsback[direction].png). That may apply for 'png' images for now for only the starsback image set, but be aware that you may need to include the dash after the next update. So for the background nebula/effects layer, examples would be: stars1-0.png, stars1-1.png, stars1-2.png, stars1-3.png, stars1-4.png, stars1-5.png for the first image set which is for the blue index. Include at least the other 3 sets for up to 4 total image sets to cover most of the space in the quadrant. Image set 5 is used for the Milky Way background.
Re: replacing star fields problem
Posted: Sat Feb 11, 2017 7:47 pm
by DORN
Hi Vice,
Thank you for the notes.
I am going to take this one step at a time.
I have a black 512 x512 .png for the nebulae.
So I need to create 4 sets of 6 .png and label them........stars1-0.png, stars1-1.png, stars 1-2.png, stars 1-2.png, stars 1-3.png, stars1-4.png, stars1-5.png and stars2-0.png. stars2-1.png, stars2-2.png, stars2-3.png, stars2-4.png, stars2-5.png and stars3-0.png, stars3-1.png, stars3-2.png, stars3-3.png. stars3-4.png, stars3-5.png and stars4-0.png, stars4-1.png, stars4-2.png, stars4-3.png, stars4-4.png, stars4-5.png. Correct?
Re: replacing star fields problem
Posted: Sat Feb 11, 2017 7:49 pm
by DORN
And put these 4 sets in the newly created "environment folder I have put in the EL root folder.
Re: replacing star fields problem
Posted: Sat Feb 11, 2017 8:19 pm
by Marvin
stars 1-2.png, stars 1-2.png, stars 1-3.png
Make sure there are no spaces ... especially between "stars" and the number. In other words, it should be stars1-2.png and not stars 1-2.png.
Re: replacing star fields problem
Posted: Sat Feb 11, 2017 8:35 pm
by Vice
And you want the \environment folder inside the install folder (where the game's EXE is located), if it's different than the save data folder.
Re: replacing star fields problem
Posted: Sat Feb 11, 2017 11:30 pm
by DORN
Success!
The nebulae are gone.
Now I can see the stars.
But I just tried changing the star field, however I do not notice any difference. I am seeing millions of stars strewn like sand everywhere.
1. Is this the milky way background? If so how do I get rid of it?
Thanks!
Re: replacing star fields problem
Posted: Sat Feb 11, 2017 11:59 pm
by Vice
Hard to say for sure without seeing it. But if you import starsback[direction].png (ie starsback[0-5].png) images, the starfield will display what's in those six images using the same 90-degree cube mapping structure as the nebula/secondary layer images. If you replace those with similar blank black images, then you may be able to better determine what may or may not be getting replaced in the process.
Re: replacing star fields problem
Posted: Sun Feb 12, 2017 12:06 am
by Marvin
I usually use a test pattern when modding the sky. For example, six small squares, each with a number in the center (0 to 5). Depending on how the numbers show up after launching the game, I can decide if I've got it right ... or figure out what I did wrong.
Re: replacing star fields problem
Posted: Sun Feb 12, 2017 4:55 pm
by DORN
Hi Vice,
I am not having any luck with the stars background. I have tried the blank.png, but maybe I am not doing it correctly.
1. What do I need to do to delete the milky way or turn it off? I think that is what I need to do at the moment.
Thanks,
Dorn
Re: replacing star fields problem
Posted: Sun Feb 12, 2017 5:09 pm
by Vice
Not sure where blank.png may have come in, but the exact filenames you will need to use if your star detail setting is 'high' are:
Starsback0high.png
Starsback1high.png
Starsback2high.png
Starsback3high.png
Starsback4high.png
Starsback5high.png
Re: replacing star fields problem
Posted: Sun Feb 12, 2017 11:34 pm
by DORN
Hi Vice and Marvin,
I am making progress. LOL.
I tried resizing a bunch of different star photos from the internet and screenshots from Stellarium and I have begun to get close to what I want.
I am now seeing the stars I have loaded in the "environment" folder.
Yes, the images need to be 1 to 1.
Where I am right now is I have a set of 1024x 1024 images from Stellarium that I set on Medium star quality in EL. The stars are perfect but I have a lot of light scattering and emergent haze on the basic image that makes the 6 sky blocks very visible. So my next step is to go back to photoshop and extract the star lights and place them on a dead black background layer. If that works, I will then resize the images to 2048 x2048 via ON1 Resize software and see if I can get all of that to work.
What a trip.
Thank you so much for your help. I will let you know if I get stuck. (smile).
Re: replacing star fields problem
Posted: Sun Feb 12, 2017 11:58 pm
by Vice
Glad it's working out now. We'll be here and ready to help if needed.
Re: replacing star fields problem
Posted: Mon Feb 13, 2017 1:59 am
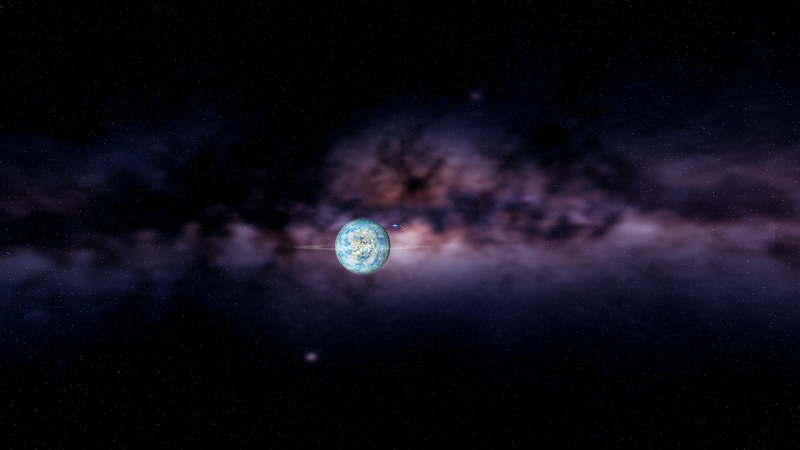
by Marvin
I use Gimp 2 and find that the Filters and the Colors options do a good job of toning down the background and making adjustments. It's what I used for the Milky Way seen in the above screen shots ... the original background was too bright and cluttered with too many stars.
Re: replacing star fields problem
Posted: Mon Feb 13, 2017 10:07 pm
by DORN
Hi Marvin and Vice,
Success. I got the cat's meow.
Thank you all so much for your help!
I went back and redid the stars.png sets with a new dead black 10 x24 .png I created in Gimp2.
Wow, even the stock stars looked great. No visible skybox panels anywhere. No light scattering. Everything seamless.
Then I took my resized Stellarium 1024 x 1024 star field and expanded it again to 2048 x 2048 with ON1 Resize demo.
The cat's meow. Totally seamless. Beautiful.
Sincerely,
Dorn
PS: I seem to remember some nebulae sets that someone did for EM that were pretty great. I may tinker some more.